
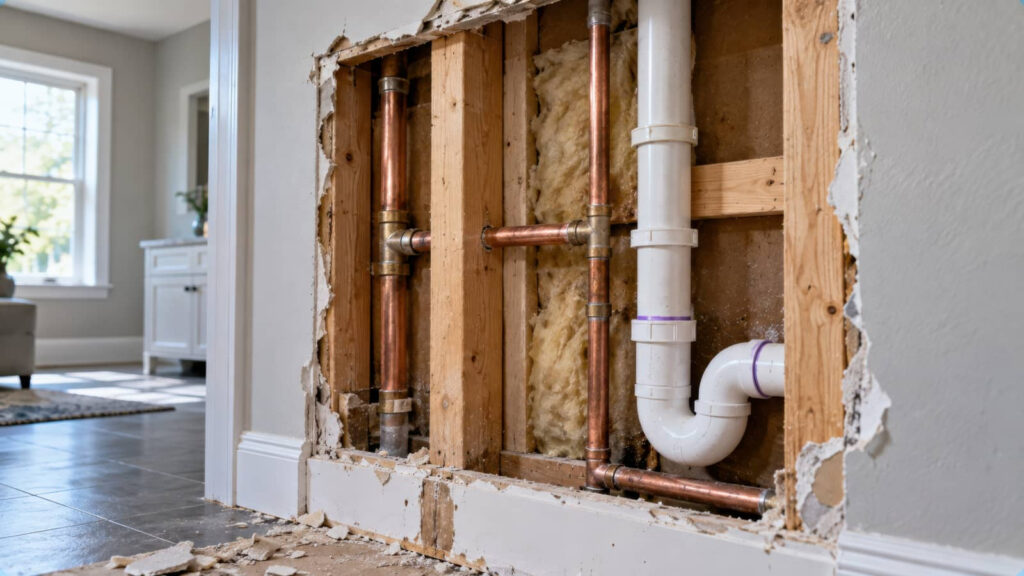
You may notice a bathroom wall that appears dry after a leak, but the drywall still feels soft and the paint is starting to bubble. Water damaged wall repair often requires more than drying alone because hidden moisture can continue breaking down the wall from behind. You need to know when to inspect deeper, when to cut out damaged material, and when a simple repair will actually hold. The right approach depends on how far the moisture has spread and what’s happening behind the surface.
Key Takeaways
- Soft, crumbled, swollen, or warped drywall usually needs replacement, not just drying.
- Hidden moisture behind paint bubbles or trim can keep damage active after the surface feels dry.
- If insulation or framing is wet, remove the affected wall section and inspect the cavity.
- Moisture meters and infrared cameras help confirm whether drying was truly successful.
- Dry quickly and lower humidity to prevent mold, but replace materials that have lost structural integrity.
Signs Water Damaged Walls Need More Than Drying
If paint bubbles, drywall softens, stains spread, or you still suspect hidden moisture, drying alone usually won’t fix the wall.
You need water damaged wall repair when surface damage keeps expanding after airflow, heat, or dehumidifiers run.
Watch for warped trim, peeling joint compound, musty odor, or a wall that feels cool and spongy.
These signs mean moisture has reached deeper materials, and the wall may no longer dry evenly.
You don’t need guesswork; you need a clear repair plan that protects the structure and your space.
In a good crew, you’ll get straight answers, fast action, and work that brings the room back to solid condition.
Prompt repair limits further deterioration and helps your wall match the rest of your home again.
How to Check for Hidden Moisture in Walls
Use a moisture meter to check suspect wall areas and compare readings across dry and damaged sections.
If readings stay elevated, scan the wall with infrared equipment to spot temperature differences that can indicate trapped moisture.
These checks help you find hidden water before you start repairs.
Moisture Meter Checks
A moisture meter gives you a quick, reliable way to check for hidden water inside a wall before damage spreads. You place the pins or sensor on clean drywall, trim, and baseboard areas, then compare readings across the wall.
Check the dampest-looking spot first, then move outward until readings drop. Mark every high reading so you can map the affected zone. Test both sides of the wall when possible, and repeat after drying to confirm the numbers fall.
If the meter stays elevated, moisture may still be trapped behind paint or drywall. Use the tool with steady pressure and consistent spacing for accurate results.
When you verify the pattern, you can act like a prepared team and start targeted repair with confidence.
Infrared Leak Detection
When moisture hides behind drywall, an infrared camera can help you spot temperature differences that often point to a leak or trapped water. You scan the wall slowly, then compare cool areas with adjacent dry sections.
These thermal changes don’t prove moisture by themselves, but they tell you where to investigate next. To work efficiently:
- Turn off fans and close windows so room conditions stay stable.
- Scan after normal indoor temperatures settle.
- Mark suspicious zones, then confirm them with a moisture meter or opening.
You’ll get the best results when you pair infrared data with physical inspection. If you’re part of a team restoring a home, this method helps everyone target repairs, protect the structure, and move forward with confidence.
Why Drywall Can Fail After It Dries
Even after the surface feels dry, drywall can still fail if moisture remains trapped inside the core or behind the wall. You may see no visible dampness, yet the gypsum and paper facing can still hold water deep inside. That hidden moisture weakens the bond between layers, so the panel can soften, swell, or crumble later.
If the wall dried too slowly, mold can also begin growing in the cavity and damage the board from within. Fast surface drying can hide warped framing, rusted fasteners, or insulation that kept the area wet.
Because you want your home to stay solid and healthy, you need to check more than touch and look for lingering stains, odor, or cool spots that signal ongoing failure.
When Drywall Repair Is Enough
Drywall repair is enough if the damage is limited to the surface layer and the wall is fully dry. You can usually stay with patching, sanding, and repainting when the core stays firm and stains no longer grow.
Check the area carefully so you feel confident in the fix and part of the team that keeps the home sound.
- Tap the wall; it should feel solid, not crumbly.
- Confirm the paper face is intact and the seam is stable.
- Prime the spot, then apply joint compound and finish with matching paint.
If the surface stays level and dry after cleanup, you’ve got a practical repair path.
Take your time, follow each step, and you’ll restore the wall without unnecessary work.
When to Replace Water Damaged Drywall
You should replace water damaged drywall if the wall has softened, crumbled, swollen, or kept staining after it dried. Those signs mean the gypsum core has lost strength, so drying alone won’t restore it.
Replace panels when seams open, fasteners loosen, or the surface caves under light pressure. You should also remove drywall if hidden moisture lingers behind paint bubbles, baseboards, or trim, because trapped water can spread damage and support mold growth.
If the damage reaches insulation or framing, replacing the affected section gives you a clean, stable starting point. In a tight-knit home team, this step protects the whole wall system and helps you move forward with confidence, not guesswork.
How to Repair Water Damaged Walls
Once you’ve confirmed the drywall can stay in place, the repair process starts by stopping the water source, drying the wall cavity, and removing loose paint, soft joint compound, or damaged tape.
You’ll work as a team with the wall, not against it, to restore a stable surface.
- Cut out any swollen edges and scrape to firm material.
- Apply patching compound in thin coats, feathering each pass.
- Sand smooth, prime, and repaint to match the surrounding finish.
Check seams, corners, and fastener heads for flex or staining before you close up.
If the wall feels solid and the finish blends cleanly, you’ve completed a practical repair that belongs in the room again.
How to Prevent Mold After Water Damage
Mold can start within 24 to 48 hours, so dry the wall cavity fast and keep humidity low until materials are fully dry.
You should remove wet insulation, open the wall as needed, and keep air moving across exposed framing.
Check the cavity, baseboards, and nearby surfaces for damp spots each day. If you still feel coolness or see discoloration, keep drying until readings stabilize.
Clean hard surfaces with a detergent solution, then let them dry again. Don’t seal moisture inside with paint or patching compounds too soon.
Keep indoor humidity below 60% with ventilation and dehumidification.
Wear gloves and a respirator when you inspect affected areas, so you and your crew stay safe and confident throughout the repair process.
Tools and Materials for Wall Repair
A proper wall repair starts with the right tools and drying materials: utility knife, pry bar, drill or screwdriver, drywall saw, putty knife, sanding block, moisture meter, painter’s tape, plastic sheeting, fans, and a dehumidifier.
You’ll use them to cut back damaged gypsum, check hidden dampness, and shape patches cleanly. Keep your workspace contained so you can work with confidence and keep the room together.
- Cut and remove: utility knife, pry bar, drywall saw.
- Measure and dry: moisture meter, fans, dehumidifier.
- Patch and finish: putty knife, sanding block, painter’s tape, plastic sheeting.
With these basics, you’re equipped to handle the repair safely and stay in control throughout the job.
How to Prevent Future Water Damaged Walls
To prevent future water damaged walls, you need to stop moisture at its source and monitor problem areas regularly. Seal roof leaks, re-caulk windows, and repair plumbing drips before they spread.
Keep gutters clear, slope soil away from the foundation, and make sure downspouts discharge far from the house. In bathrooms, kitchens, and basements, run exhaust fans and dehumidifiers to control humidity.
Inspect paint bubbles, soft drywall, and new stains early so you can act before damage worsens. If you share a wall with moisture-prone spaces, use vapor-resistant materials and proper flashing.
A routine inspection schedule helps you stay ahead of repairs and keeps your home’s structure strong. When your crew stays consistent, you protect the whole space together.
Frequently Asked Questions
How Long After Water Damage Can Mold Start Growing?
Mold can start growing within 24 to 48 hours after water damage if you don’t dry materials fast enough. You should inspect hidden areas quickly, since damp drywall and insulation can trap moisture and support growth.
Does Homeowners Insurance Cover Water Damaged Wall Repair?
Usually, yes—if a covered peril caused it. Why wouldn’t you check? You’ll need policy details, photos, and prompt reporting. If leaks came from neglect, you likely won’t be covered, so verify exclusions carefully.
Can I Paint Over a Water Stained Wall?
You shouldn’t paint over a water-stained wall until you’ve fixed the leak, fully dried it, and sealed the stain. Otherwise, you’ll trap moisture, let stains bleed through, and risk paint failure.
Should Electrical Outlets Be Inspected After Wall Water Damage?
Yes—you should inspect outlets after wall water damage. Hidden moisture can corrode wiring, trip breakers, or shock you. You’re not alone in this repair; have a licensed electrician test and replace damaged devices before power’s restored.
How Do I Know if Insulation Behind the Wall Is Wet?
You’ll know insulation’s wet if you smell mustiness, feel cool wall spots, see staining, or detect moisture with a meter. Cut a small inspection opening, then check for damp, compressed, or discolored insulation.
Review
If you catch water damage early, you can save your wall before it turns into a full-blown disaster. But once drywall swells, softens, or hides moisture, drying alone is barely a bandage on a broken bone. You need to inspect, cut out damaged material, and stop mold before it spreads like wildfire. Replace compromised sections fast, and you’ll protect your home’s structure, safety, and future repair costs.